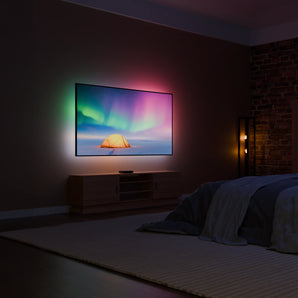
Det er hurtigt og nemt at komme i gang med din AmbiSync 2. Uanset om du kalder det et TV-ambilight, HDMI-sync backlight eller dynamisk LED-strip, vil denne opgradering forvandle din måde at se film, spille spil og opleve underholdning på. Følg disse trin for at installere din BULP AmbiSync 2 korrekt og få en helt ny oplevelse af fordybelse.
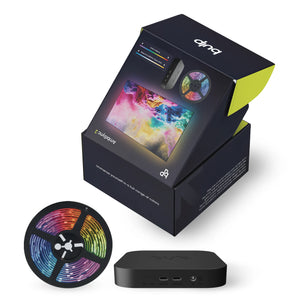
1. Pak dit kit ud – Din AmbiSync 2-oplevelse begynder nu
Tag forsigtigt din AmbiSync LED backlight kit ud af emballagen. I pakken finder du:
LED-striben
Strømadapteren
BULP HDMI-sync boksen
De nødvendige kabler
Sørg for, at du har alt klar, før du går i gang med installationen.
2. Placér LED-striberne – Jævn belysning, maksimal effekt
For den bedste omgivelsesbelysning skal du fastgøre BULP's reaktive backlight-striber bag på dit TV. Følg disse trin for optimal placering:
Start i nederste venstre hjørne af dit TV.
Fastgør LED-striben og følg konturen med uret rundt om skærmen.
Sørg for, at LED'erne er jævnt fordelt for den mest harmoniske og intense belysning.
Dette sikrer, at dit AmbiSync LED TV-lys leverer flydende, dynamiske farveovergange uden ujævnheder eller mørke områder.
3. Tilslut HDMI-kablerne – Kernen i din dynamiske belysning
Dit BULP HDMI-sync belysningssystem spejler det, der sker på skærmen i realtid. Sådan sætter du det op:
Tilslut BULP HDMI-kablet til HDMI-udgangen på sync boksen.
Forbind din TV-boks, Chromecast, spillekonsol eller streaming-enhed til HDMI-indgangen på sync boksen.
Sæt LED-strip-kablet i "LED Strip"-porten for at fuldende forbindelsen.
Når alt er tilsluttet, er dit intelligente LED-backlight-system klar til at reagere på hver eneste scene i dine yndlingsfilm, serier og spil.
4. Tilslut strøm – Tænd for lysshowet
Sæt AmbiSync 2's strømadapter i en stikkontakt. Så snart systemet får strøm, vil din LED-sync backlight levere levende omgivelsesbelysning, der tilpasser sig skærmens indhold i realtid.
5. Tænd dit TV – Læn dig tilbage og nyd oplevelsen
Tænd for dit TV, og se, hvordan HDMI-backlight-systemet straks synkroniserer med din skærm – ingen apps, ingen besværlig opsætning, kun ren fordybelse. AmbiSync 2 TV-lyset justerer sig automatisk efter billedet og sikrer en biograflignende oplevelse fra det øjeblik, du tænder.