Het opzetten van je AmbiSync 2 is snel en eenvoudig. Of je het nu een TV-ambilight, HDMI-sync backlight of dynamische LED-strip noemt, deze upgrade verandert hoe je kijkt, speelt en entertainment beleeft. Volg deze stappen om je BULP AmbiSync 2 correct te installeren en een geheel nieuw niveau van immersie te ervaren.
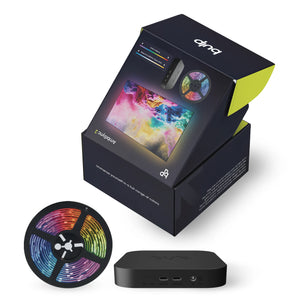
1. Pak je kit uit – Jouw AmbiSync 2-ervaring begint hier
Haal je AmbiSync LED backlight kit voorzichtig uit de verpakking. In de doos vind je:
De LED-strip
De voedingsadapter
De BULP HDMI-sync box
Alle benodigde kabels
Controleer of je alles hebt voordat je met de installatie begint.
2. Plaats de LED-strips – Gelijkmatige verlichting, maximaal effect
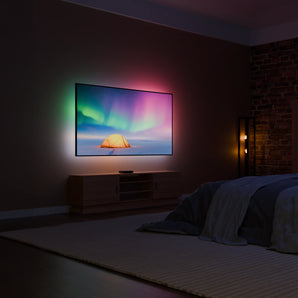
Voor de beste ambiente verlichting bevestig je de BULP reactieve backlight-strips aan de achterkant van je TV. Volg deze stappen voor een optimale plaatsing:
Begin in de linkerbenedenhoek van je TV.
Bevestig de LED-strip en volg de randen met de klok mee rondom het scherm.
Zorg ervoor dat de LED's gelijkmatig verdeeld zijn voor de meest vloeiende en meeslepende verlichting.
Deze stap garandeert dat je AmbiSync LED TV-verlichting vloeiende en dynamische kleurveranderingen weergeeft zonder onderbrekingen of donkere plekken.
3. Sluit de HDMI-kabels aan – Het hart van je dynamische verlichting
Je BULP HDMI-sync verlichtingssysteem reageert in real-time op wat er op je scherm gebeurt. Zo sluit je alles correct aan:
Steek de BULP HDMI-kabel in de HDMI-uitgang van de sync box.
Verbind je TV-box, Chromecast, gameconsole of streamingapparaat met de HDMI-ingang van de sync box.
Sluit de LED-stripkabel aan op de ‘LED Strip’-poort om de verbinding compleet te maken.
Met deze aansluitingen is je slimme LED backlight-systeem klaar om te reageren op elke scène in je favoriete films, series en games.
4. Sluit de stroom aan – Laat het lichtspel beginnen
Steek de AmbiSync 2-voedingsadapter in een stopcontact. Zodra de kit wordt ingeschakeld, zorgt de LED-sync backlight direct voor levendige verlichting die zich in real-time aanpast aan je scherm.
5. Zet je TV aan – Leun achterover en geniet
Schakel je TV in en zie hoe het HDMI-backlight-systeem direct synchroniseert met je content—geen apps, geen extra configuratie, alleen pure immersie. De AmbiSync 2 TV-verlichting past zich automatisch aan jouw beeld aan en creëert een meeslepende kijkervaring vanaf het moment dat je de TV aanzet.